
Beauty, Beautiful, Beautiful,
I have everything I want.
I have the fire of constellations extinct for millennia.
And the risk very short-it was? Passed-so many shooting stars.
The aurora switches off
And I keep the purest tears of dawn.
The day comes, and day inside,
I still possess the secret of big night.
Beauty, Beautiful, Beautiful,
I have everything I want.
(BANDEIRA, 2008, p. 108)
Step by step 6 of how to draw

The artist is the one who has a world in your hands. The force of his inspiration, switch off the tribulations, forget the setbacks. The idea viçosa, blooms, blooms and color tints, in the middle of empty space. In the target area, the colors and the shapes already existed, him though. For the sculptor, If the stone is rough, the image was already there, embedded, enrustiu of stone and if desvestiu. And the work germinates, in the Painting, in Sculpture , as germinated always, in all the Art History. So right, as the sunset. And that nothing was, acquires spirit, wear life and displays your personality. A work.
It's up to whoever creates, follow your thinking and believe that every detail of your original idea is important, so the work take shape. Can be of great value a stub on a separate sheet. Then the scene will if composing, slowly, as in a puzzle, where each piece should be attached, one by one, gently. Each element is a separate scene. Plan a work requires to fill gaps, on the white background, although, and often, the Beauty of the work, be the empty, just filled with color, no elements. Makes you think.
Plan means guiding the scene on paper and estimate where in each character, each object will be, for everything to be in the right place following the initial inspiration. With that thought I am sharing the steps that I follow, my last work, in text, in pictures and video. The idea is a scene that will compose a story. And that's the first part. Paradise, How to call this chapter, runs with color pencil on paper basis weight 160, with 42 cm tall, by 17,5 cm wide, without texture, color cream.

Following so the inspiration that I snatched, through a dream, planned the landscape in a paper to the, in simple stub, to make sure that all elements be there. I came to write the names of all who would compose the scene, including colors, animals and mountains, Although it has not used all these elements I planned, so that there was no final effect of information overload, of exaggeration. The rectangular paper had to be worked vertically, to make the game of the other scenes. The difficulty of working with the role accordingly consists in preparing many plans, that is, elements that are close and others, in different distances. Then did a preparation of these plans on paper, in the form of three straight lines, the center of the leaf, with an average distance of 5 cm between each row. Each row would correspond to a plan.
Empty scene, the elements were then emerging. The mountains and the trees in the distance; Some animals a bit closer; and other closer. For the positioning of these elements however, I did a study of colors, to animals highlight the scene, without mixing the blue of the sky or the green of nature. Are not needed yet, many details of the scene, only the risks, made with graphite 2B, You then will be filled with the color pencil.

Though there are many artists who start painting the background of the scenes, My preference is to always paint, from the top of the sheet, to the bottom (Fig. 3). It to run the risk of fouling or blurring the already painted. Remember that each artist develop his technique and the way that suits you, for its creation. So is the freedom in Art.

In the scene I will taking shape, the upper part of the sky (Fig. 1) receives a dark blue, that will gradually lighten, as it descends on the sheet. Passes then to lilac, then the Red, to orange and finally to yellow, that represents the sun setting on the horizon, the center of the image. The mountains can then begin to be painted. Those that are more in the background, in the foreground, are in medium shade of blue, because little glimpsed of your original color, due to the distance. In the background, down the image, the mountains are in shades of gray, in a part of them, the light yellow, represents the sunlight reflected on its surface and the black, the parts that are not lit.
Note that the trees (Fig. 4) are in perspective and decrease in size toward the vanishing point, located in the center of the image. All of them feature a lighter side and another darker, due to the sunlight that falls on them. The same occurs with the lawn a little ahead of the trees and the stones. Amid the rocks and in the water, the leaves of the Bush are irregular, made with light scratches, in vertical direction, always from bottom to top, in black, Green and Brown. The same light that focuses on the mountains and the trees falls on animals. To give this effect, just leave blank what is illuminated.

Important to note that the water represents a mirror and reflects all that is above. This Lake, must be the colors of the sky, What are the Blues, Lilac, the Red, Orange and yellow. Are the green of the Woods and the varied colors of animals, just below each. In the water, the fish (Fig. 5) are submerged, so its colors may not be very vivid. They still receive a slight blue tint, because of the color of the water. In this scene, the movement of water is light, There are small ripples, that fragment the images, reflecting only the colors and sketches. The legs of the flamingos and the risks of the leaves of bushes, must be scratched lightly, irregularly, below them, from top to bottom, slightly wavy, as if they were being interspersed by the waves. Remember to leave it in the water some portions in white, representing these slight waves. Finalize strengthening throughout the drawing, with the black color in the places, where the sunlight does not affect.
I like to emphasize that the artist is the one who has the free spirit to act in his work and create their worlds. But it is worth remembering that, and often, a research on a particular theme will be treated, can bring great help in the development of an idea. And, a notebook with the artist, can be a good place to record those good ideas, so they don't dissipate. Leave work for a few days or even weeks in a place visible to the artist, You can take it to mature concepts and make the work closest to his initial idea.

The invention is what moves the soul of the artist, takes you to the ecstasy of creation. Maybe that's the great momentum of art, his most important imperative. The observer, in love with the world and life may seem to the world only one person distracted and dispersed, but he nothing wrong in detail, in love with all you see. Worth inspiration.
Check out the video lessons Artist Rosangela Vig:
Class 1 – The composition of the idea and the Division of the scene on paper:
Class 2 – Scene complete with the elements outlined:
Class 3 – Beginning of the painting of the background of the scene:
Class 4 – Painting the sky and large surfaces:
Class 5 – The softness of the pencil in the sky painting:
Class 6 – The mix of colors in the sky in the late afternoon and the mountain painting:
Class 7 – End of the painting of the distant elements of the scene:
Class 8 – The painting of animals:
Sign up to receive Event News
and the Universe of Arts first!
Class 9 – The painting of other elements of the scene, the stones, the Woods and water:
9. The class – Water paint:
9. Class B – Finished painting:
Material used:
- Black pencil for drawing 2B or mechanical pencil 0,7 with graphite 2B;
- Soft rubber;
- Free texture for drawing weight 180, size 42,5 x 17,5 cm;
- Common color pencil, with 48 colors.
…
Liked? [highlight]Leave a comment[/highlight]!
You might also like:
- Painting on Canvas, Step by step 18 – Perception of colors and shapes by Rosângela Vig
- Design – Artistic Production, Step by step 17 of how to draw by Rosângela Vig
- Drawing – Painting on Canvas, Step by step 16 of how to draw by Rosângela Vig
- Design – Study of the Form, Step by step 15 of how to draw by Rosângela Vig
- Design – Artistic Production, Step by step 14 of how to draw by Rosângela Vig
- Design – Artistic Production, Step by step 13 of how to draw by Rosângela Vig
- Design – Artistic Production, Step by step 12 of how to draw by Rosângela Vig
- Design – Artistic Production, Step by step 11 of how to draw by Rosângela Vig
- Design – Artistic Production, Step by step 10 of how to draw by Rosângela Vig
- Design – Artistic Production, Step by step 9 of how to draw by Rosângela Vig
- Design – Artistic Production, Step by step 8 of how to draw by Rosângela Vig
- Design – Artistic Production, Step by step 7 of how to draw by Rosângela Vig
- Drawing and Painting – The Abstract, Step by step 5 of how to draw by Rosângela Vig
- Drawing – Movement, Step by step 4 of how to draw by Rosângela Vig
- Drawing – Study of Colors, Step by step 3 of how to draw by Rosângela Vig
- Drawing – Study of Light and Shadow, Step by step 2 of how to draw by Rosângela Vig
- Drawing – Study of Perspective, Step by step 1 of how to draw by Rosângela Vig
Articles about the Art History of Rosângela Vig:
References:
- BANDEIRA, Manuel. Manuel Bandeira, Pocket. Porto Alegre: L&PM Editores, 2008.
The figures:
Fig. 1 – Mountains, trees and rocks, Rosângela Vig.
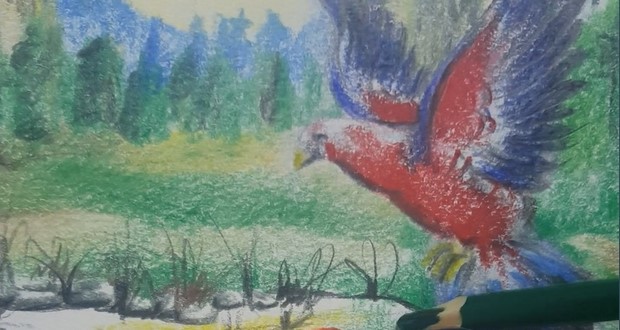
Fig. 2 – Details of the bird, Rosângela Vig.
Fig. 3 – The top of the scene, Rosângela Vig.
Fig. 4 – Details of the trees, Rosângela Vig.
Fig. 5 – Flamingo and fish in the water, Rosângela Vig.
Fig. 6 – Work Haven, work completed, Rosângela Vig.
ROSÂNGELA VIG
Sorocaba – São Paulo
Facebook Profile | Facebook Fan Page | Website
Columnist at Website Obras de Arte
E-mail: [email protected]